Search A n R

Monday, December 12, 2011

Heart(h) and Home ~ Subasri's Tuscan inspired Kitchen

I have been a fan of Subasri's photography for a long time now. For people who are active on flickr, Sri needs no introduction. She is a supermom!! a wonderful cook and an amazing photographer. She also manages to squeeze in her art and craft projects along the way! I am glad she agreed to let us peek into her beautiful Tuscan inspired kitchen.

Hop on to soak in all the yummy goodness...one can find her artwork in every corner :)


Same space with a little change in decor...a huge fan of the cute masala box /the wooden box with ceramic cubbies 

In love with her accessories :-)..all the paintings and pottery are hers and her daughters' work


Beautiful display needle point work by her grandmother


A few changes and the same space looks so different..loved her artwork on the wall

view of the dining area 


I am floored :)....Creativity oozing from every accessory in her lovely kitchen- Mexican pottery used for storing onion and potatoesHide all

a close up

And as I mentioned she is a wonderful cook :)...another yummy dish in the making

Creativity ~ can make everyday kitchen ingredients look so classy.

Take a deep breath and let the yumminess sink in...

Hope you liked the tour ...If you like to see more of her work..here is the link to her FLICKR stream!


PS: more kitchen tours >> Kitchen tours ~ Heart(h) and home

Wednesday, December 7, 2011

Snake Gourd Perugu pacchadi (twist) ~ Thayir pacchadi ~ Yogurt Dip / dressing

I had posted snake gourd seed recipes earlier and am back with a small twist to the usual thayir pacchadi / perugu pacchadi. Snake gourd (including seeds) in curd- making a flavoured variety of curd/yogurt dressing or dip.

This perugu pacchadi is very simple and is a neat way to serve this veggie to people who dont like it :)

All you need - serves 2 or 3
Yogurt /curd /thayir -1 1/2 cup ( beaten)
Water - 2/3 tbsp
Snake gourd - 1 cup (chopped along with the seeds)
Green Chillie- 1 
Red Chillie - 1
Curry leaves - 3
Ginger - 1/2 tsp (optional)
salt- to taste
asafoetida (hing)- a pinch
Turmeric - a pinch

Tempering
mustard seeds - 1/4 tsp
urad dal - 1/2 tsp
chana dal - 1/2 tsp
jeera /cumin - 1/4 tsp
coriander seeds -1/2 tsp (optional)
 cooking oil (prefer til or sunflower oil) = 1/2 tsp

Garnish (optional)
ghee or til oil - 1/tsp
cumin - 1/4 tsp 
mustard seeds - 1/4tsp
urad dal - 1/4 tsp
chana dal - 1/4 tsp  

Topping
coriander/cilantro -1/2 tsp

What you do
Wash and chop the snake gourd use the seeds as well. 
In a pan, pour the oil for tempering and add the tempering ingredients (mustard seeds, urad dal, chana dal, cumin seeds, coriander seeds) in that order and roast for a minute or so.
Add curry leaves, red and green chillies, ginger and saute
Add snake gourd and the coconut, salt, turmeric, hing(asafoetida) and keep stirring until its done 
Let the mixture cool and then grind it into a smooth paste (add a little water if necessary)
In the meanwhile, prepare the curd - Add 3 tbsp of water to the beaten curd and add the ground mixture to the curd 
Now tempering - in the same pan, add ghee or til oil and put in a little mustard seeds, urad and chana dals, cumin and roast it until mustard crackles and the dals turn a golden brown 
Let it rest for a minute or so and then pour it over the prepared thayir pacchadi (never pour in anything hot into curd or butter milk- it curdles it up and separates the water content from the curd)
Garnish with cilantro/coriander leaves 


On the menu 
Chinna vengayum sAmbAr, Oven roasted Cheppankazhangu with the thayir pacchadi

Serving suggestion: With steamed rice or rice varieties (jeera rice, vegetable rice, pilaf/pulao etc), parata, and works wonderfully as a salad dressing.  :)

trivia:
Tamil kitchens make podalanga kootu and mooru kootu & telugu kitchens make pappu, and perugu pacchadi with the roasted version of this vegetable. My version of the perugu pacchadi is what i call an extension of the same genre but with a twist in presentation and use of the veggie

Wednesday, November 30, 2011

Guest Post ~ Saravana's Banana Flower Fry / Poriyal / vepudu

I met Saravana Kumar through a friend. In the few days of knowing him, I loved our common love for food and the will and interest..No..a strong need to experiment with ingredients. He is among those very few single men who can actually cook - really well! I need to mention his sense of humour and his meticulous (food experiments) documenting skills (I have been planning to do that for ever!!). I am so glad to have met another soul who has a holistic approach to food and cooking.

So over to Saravana.... :-)

Banana Flower Recipe
Banana Flower (Arati Puvvu in Telugu, Vazhai Poo in Tamil), which may also be called banana blossom, is used as a vegetable in India, especially in South India. It is known to have many medicinal values
Owing to its cumbersome process in cooking this flower, this recipe is not tied often. However, it is not so laborious process to cook this flower, if you have some practice. This flower is a classical example for acrid (vagaru in telugu,) taste.

Many cuisines add the sliced banana flower to meat stews, stir-fries, soups, and rice or noodle combinations. It is also used in cold salads, with the salad mixture presented to the diner in one of the large purple-red outer bracts.


How to peel the flower for use
I suggest coating the hands with cooking oil prior to working with it  
Banana flower consists of many layers of bracts or petals. Under the layer of each petal are a bunch of florets. Remove the hard pink petals and take out the florets found underneath. Once the tougher, darker outer bracts are pulled away, the paler and tender inner leaves are used in the recipe.

In each floret, you will find a string in the middle with a tiny head and also a small plastic like white cover around it. Both are not edible. Remove both from all the florets. The florets in the upper portion are slightly bigger than the florets in the inner portion. From the big floret, you can easily see these and remove it. But it is little difficult to find the string in the small florets. You have to open each small floret gently by your fingers and remove the string and cover. To do this, take a bunch of florets in one hand and hold the bottom and gently rub the top of the florets in your palm. Now the florets will open up and you will see the strings in each floret. Remove it. When you remove the hard layers, you will find the color of the bract will change from dark pink to a pale yellow and finally end up with a small white bulb The florets in the inner portion will be more tender. You can use the tender florets and the small white bulb as it is. No need to remove string or anything from these.

Then chop all the florets into tiny bits (you can whip them in a blender too) and put in water mixed with little butter milk till you cook the same. This will avoid discoloration of the florets.

And now for the Recipe
Ingredients
Banana Flower: 1 Large bulb / 500 grms 

Salt: to taste 
Spice:  Green Chillies - 3 small, slitted  
Tamarind Pulp / Paste - 2 tsps 
Buttermilk - just enough to soak the chopped florets

Tempering:
Asafoetida : 1 Pinch
Mustard Seeds: ½ spoon
Chana Dal – 1 spoon
Urad Dal  - 1 spoon
Curry Leaves -

Oil / Ghee  - 2-3 spoons 


The Recipe
Tempering:  Add oil in a wok or a pan. Add to it the usual spices, depending on your interest to make the curry as spicy as you like
Add Asafoetida, Mustard seeds, Bengal Gram and Black Gram and fry till they become brown. You can add sufficient amounts of green chilly slices, as per your requirement. Add the sliced florets to the above mixture and boil in a simmer. You can add a little water and boil the mixture till cooked, around 10 minutes on low flame.

Serving Suggestions
Serve hot, along with Rice or Rotis.  Accompaniments with this dish should be usually very tangy or spicy like pickles, chutneys or spicy salads which generally go well with acrid taste.

Other Dishes with Banana Flower:
Banana Flower in Curd - Perugu Pacchadi
Banana Flower Vadai
Banana Flower with Mango - a gravy 

Trivia
Banana Flower is used in many other cuisines, across many far eastern countries .


Actual lunch menu on the specific day: 
Rice (with urad dal called Mudganna) (center), with Banana Flower Curry (extreme right) along with Moong Dal (left) and Mango Ginger Chutney.


Served in Banana Petals


footnotes (courtesy wiki)
  • Banana flower is considered to be a good source of vitamins A and C. It is considered for its blood purifying qualities and is effective in curing Gynec disorders. It increases hemoglobin levels in the blood and is traditionally believed to be beneficial as a lactating agent.
  • The cut ends of the banana flower leak a sap that will stain skin and other surfaces black. The precaution of rubbing the hands with cooking oil makes cleanup easier. Exercise care while handling so that the flower does not stain your clothes.
  • Banana flower is also treated in several Asian and tropical cuisines as a vegetable. It is known in Japan as ‘Banana no tsubomi’, in Thailand as ‘dok kluai’, in Indonesia as ‘jantung pisang’, in China as ‘Shang chao fua’, in Sri Lanka as ‘kehel mal’. The words “banana flower” are variously translated as “banana blossom,” “banana heart,” or “plantain blossom.”
-----------
I appreciate Saravana Kumar to have taken time out to send me this wonderful write up.

Pics and content courtesy: Saravana Kumar

Saturday, November 26, 2011

Heart(h) n Home ~ AnR Lab :)

I have been sharing some amazing kitchen tours on AnR. How could I not share my space on the blog. So here it is...the current AnR lab.

My kitchen is a very cozy space.  An 8 x 8 which opens up to my dining area. It is smaller than my previous kitchen. But works really well for my extensive cooking and baking.


I love my older cabinets and the counter top..have some issue with the stove, but do my best with it!!
and yes, my kitchen looks like this most of the time, minus the dishes over the sink...:)

I  love my vintage glass jars, tin cookie boxes, and keep quite a few cotton hand towels around. I prefer to keep paper towels and styrofoam, plastic and single use items out of my space.


Best part of my kitchen is the tiny window over the sink...It made me say yes to this apartment :)

Lovely view ~ makes my dish washing a breeze :)

Before I end this post, I need to thank all those who are a part of my blogging journey. Thank you for taking time out to leave your comments and making my day :)....My food journal is incomplete without you guys

Do check out my previous kitchen tour posts...>>Here

Tuesday, November 22, 2011

Snake gourd Seeds and amaranth leaves Thuvayal / masiyal

I generally shy away from sharing my off beat recipes but then thgt why not dare posting something this time :). It hurts when people who cant think out of the box tease me about my cooking. and even say "so what" or its no big deal..hmm what say when it is your own family and friends...hence the "keep it to myself" thgt of mine precedes my posts.. im just too much of a baby and cant handle such things i guess...

The thuvayal recipe is fairly simple with basic ingredients ~ tempering, and flavouring and the base ingredients...so here you go!

all you need
base ingredients
  1. snake gourd seeds - 1/2 cup
  2. amaranth leaves - 1 1/2 cup
  3. garlic - 1 clove (optional) (but would be good with just ginger as well!!)

condiments / flavouring 
  1. salt to taste
  2. tumeric powder- 1 pinch
  3. hing / asafoetida - 1 pinch
  4. Tamarind pulp - 2 tsp
  5. green chillies - 2 

tempering
corainder seeds - 1/2 tsp
cumin seeds - 1/4 tsp
mustard seeds - 1/4tsp
chana dal - 1/2tsp
moong dal - 1/2 tsp
urad dal - 1/2 tsp
oilve or sunflower oil - 1/2 tsp (according to your choice)
red chilli -1 (optional)
curry leaves - 5-7 (optional)

What you do :

  • Wash and chop Amarnath leaves and set aside to drip dry in a colander
  • peel garlic, and wash the snake gourd seeds and drain
  • In a pan or a kadahi pour olive oil and put in tempering ingredients - mustard, urad dal, chana dal, moong dal and red chilli and cumin and coriander seeds; Saute on medium flame
  • add garlic and the snake gourd seeds, curry leaves, green chillies and saute for another minute or until the seeds look translucent
  • add the leaves and saute for 2-3 minutes
  • add salt, turmeric powder, hing and cook for another minute or so (or until the mixture no longer has a raw smell but looks and smells yummy)
  • transfer to a plate and let the mixture cool
  • Grind (mixture and tamarind paste ) to a fine or a coarse paste (as per your choice for thuvayal / masiyal )
  • Serve with rice or roti...is a yummy alternative to regular thuvayals and a great way to include greens in ur diet


Snippets
Amaranth leaves - also called thota koora in telugu is a great source of fiber 
Amarnath seeds are a great source of gluten free is very good for people with coeliac dieases 
This paste /thuvayal can be used as a green sauce base for gravy curries 
mixed into roti dough, it makes great rotis as well (flavoured rotis or a diff variety of theplas maybe!!)
I have used this variation instead of pesto in pasta..i know ..i m crazy!!
a little (1 tbsp ) in the gravy makes a very creamy and healthy soup base as well...
you could add a little coriander leaves / cilantro and mint to make a perfect chutney for snacks (samosas and chats)- Believe me !!
So add this yum thuvayal in ur diet and have fun with food..a little thought into what you eat goes a long way :)

Monday, October 31, 2011

Diwali Special ~ Nutritious Mixed Dal ladoo ~ Kadhamba paruppu urundai

Diwali came and went by. I made some mixed dal ladoo. My hubby dear loves them. lol...he never refuses any ladoo variety I make..so I dont get surprised when 15 of them vanished in three days!!

I generally use most of the lentil/dals in varying combinations each time I make them. This time around..this is the combination


What you need
Moong dal - 2/3 cup
Masoor Dal - 2/3 cup
Urad Dal - 1/3 cup
Chana dal - 1/3 cup
light brown or Granulated sugar or jaggery- 1 1/4 cup ( or to suit your taste)
Elaichi powder - 1 tsp
melted unsalted Butter or ghee - 4 tbsp
raisins - 3 tbsp
Roasted almonds - 3 tbsp (split or coarsely crushed)

Process
1- Dry roast all the dals until you get a soothing aroma from them...take care when roasting. burnt dals will result in bitter tasting ladoos
2- spread roasted dals on a tray or a plate to cool
3- Grind them to the a stage where they are a combination of fine-coarse (a little finer than upma rawa /coarse sooji)
4- Pour into a mixing bowl and add sugar and elaichi powder
5- Saute curshed almonds and raisins in 2 tsps ghee and add them to the dal mix
6- Pour in the rest of the ghee and mix well until the ghee or melted butter is completely blended with the dal mix. (mixture should be moist and flaky)
7- Take a spoon full of the mix and start binding/rolling them

They ended up really yummy with this combo as well..Also made thattai and murukku to go with the ladoo


note: 

  • I melted 1 stick(4 oz) of unsalted butter
  • if using ghee make sure its a little warm helps in binding the ladoo better

Friday, September 23, 2011

Heart(h) and Home: Vidya's Kool Kitchen

Showcasing a simple yet very functional Indian Kitchen..(my Sister in law's) . :)


A very homey kitchen :-)..and Prachi's mention of the indian dish rack/utensil stand prompted this post :)

Joining Patty's "In the Zone" Link up :)


Wednesday, September 21, 2011

Stuffed Capsicum ~~ anyone!!

dug out a very old folder and thgt id document my stuffed capsicum on AnR....

ingredients
1/4 cup each - grated potatoes, chopped  capsicum (i used yellow and green ones this time)
three whole capsicums
cumin, salt, turmeric, garlic crushed
2 tbsp mozarella
1 tsp olive oil

how its made: :)


use a pan to saute chopped veggies with some oilve oil & add salt, cumin, garlic and turmeric

In the meanwhile, rub some salt on the capsicum shells and microwave them for 2-3 minutes with two tbsp of water
Stuff the half done capsicum with the sauted mixture and arange in a baking dish and cover it with a foil
bake at 350 F/180C for 20 minutes 

take off the foil and top it with grated mozarella and bake it with out the foil until the cheese melts (roughly 3-5 minutes)

was great as is or with pulka or rice and dal


Thursday, September 8, 2011

Bharwa(n) Bhindi - Oven roasted and yummy!

Learnt it from a friend's mom and made them for the first time while in my Under-graduate program. I should say they turned out ok then, and my amma was impressed!!  Have been making them ever since...off and on before the wedding and then almost once a month for hubby dearest, a huge okra fan...so wouldnt he be the happiest! Flavour and texture of the batch I make has definitely improved over time.

You need

20 medium sized okra/bhindi
1 tbsp chopped coriander leaves/cilantro

tempering
2 cloves of garlic (crushed)
1tbsp olive or sunflower oil
1tbsp cumin seeds
1/4 tsp turmeric powder
1tbsp oil (olive or sunflower)

filling
1/3 cup chick peas / besan flour
1tbsp red chilli powder
1/2 tbsp turmeric powder
3 tbsp lemon juice or 1 tbsp amchur powder
2-tbsp cumin+coriander powder (I use kuzhambu powder
1/2 tsp hing/asafoetida
2 tbsp oil
Salt to taste
1/2 tsp Goda masala (for that extra punch- you can skip it) 

Procedure
Wash and drip dry/ pat dry the bhindi and slit them vertically; keep aside
Make the filling - mix in all the ingredients and stuff the okra 
prepare the tempering - in a kadai/pan pour 1 tbsp oil and put in crushed garlic, jeera (cumin) and hing and gently place the okra and fold in to coat the okra with the oil
Take the mixed in and tempered okra and place them on a baking tray
Bake your yummy okra for 25 -30 minutes at 350F/180 C (middle rack)

Pull the tray out of the oven and garnish with cilantro/coriander leaves and Voila!!

Works well with mooru kuzhambu and rice! or with plain roti and dal as well. Of course, my hubby has it as a snack :P... 

Trivia
I also use ragi /millet powder instead of besan
If you were to cook it on the stove and skip the oven, then just make sure you cook it on low to medium heat and never cover the dish. Covering leaves the dish limp (steam does its job!!)
Oven Roasted dishes consume less oil, hence the recipe!
Tried serving them as starters too and they were a hit
Garlic and hing/asafoetida are to balance the hard to digest chickpeas flour


Any variation to the recipe are all welcome...never hurts to learn :)

Tuesday, September 6, 2011

Eggless Banana Chocolate Bread

Pillayaar Chathurthi meant, we bought a whole load of fruits. For just tw of us its definitely too much :).


Extra bananas promptly turned into Low Fat Eggless Banana bread. This is an easy bake recipe. you could substitute the whole wheat flour with all purpose as well.

What you need : makes 15 (1/2") slices

1 cup mashed bananas - (it took me three ripe ones)
1 1/4 Cup whole wheat flour
1/3 cup yogurt or 1/4 cup butter milk (optional / substitute with 1/4 cup warm water)
2 - 3tbsp olive oil
3/4 tsp baking soda
1 tsp baking powder
1/4 tsp salt (optional)
3/4 cup light brown sugar
1 tsp Elaichi (cardamom) powder
1 tbsp unsweetened Chocolate powder (any baking choc powder is fine)
2 tbsp water (as needed) (skip this if you use butter milk)

What you need to do
Preheat your oven @350F/180C
In a mixing bowl, mix in the flour, baking soda, salt, sugar, cardamom powder, chocolate powder
Add yogurt/butter milk and mashed banana to the dry mix and fold well. 
Add olive oil, and water to bring it to a cake batter (dosa/idli batter) consistency
Bake for 35-40 minutes in the middle rack @350F or 180C
Do the fork test. Extend the bake time by another five minutes if needed

Want to see how  mine turned out this time


Wednesday, August 31, 2011

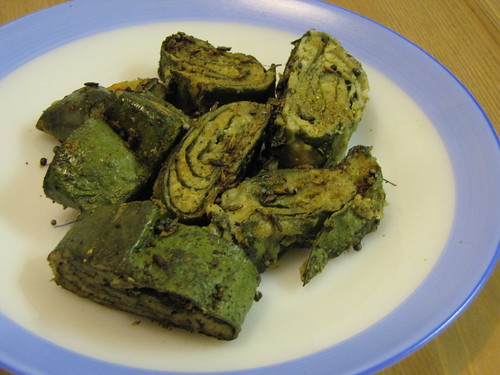
Patra anyone :)

I make these when possible. This batch was special because the leaves grew in my tiny balcony garden


patra

Friday, July 22, 2011

Guest Post ~ Lakshmi's Pumpkin Roti & Beetroot Dry Curry ~ You are invited!!

I bring to you a very yummy dinner menu from Lakshmi's Kitchen. We meet a few people in our life, with whom we seem to connect so well, and it feels like you have known them for ever. Lakshmi is one such person for me. After persistent efforts, I could get her to send in a recipe with a pic for my recipe box a.k.a. The food blog-avial n rasam :)

Here is what she sent me...:)

Pumpkin Chapathi
Ingredients:
•1 medium-sized cooked, peeled and well mashed yello pumpkin
•2 tsps coriander powder
•1 tsp cumin powder
•1/2 tsp cumin seeds
•1/2 tsp turmeric
•1 tsp olive oil
•Salt to taste
•3 tbsps finely chopped coriander leaves
•2" piece of fresh ginger grated fine
•4 cups whole-wheat flour
•Water to mix (1/3 cup of water)
Method
•Mix all ingerdients (mashed pumpkin, coriander and cumin powders, cumin seeds, turmeric,  salt to taste, chopped fresh coriander and grated ginger) into a large mixing bowl.
•Add the wheat flour, oil to all the ingredients (except the water) and prepare a dough of the mixture.Mix together very well
•Now slowly add water, a little at a time and knead well to make a smooth dough, Cover and set aside for an hour.
•Divide the dough into golf ball-sized portions and roll between your hands till they are smooth and without cracks.
•Very lightly flour a rolling board  and roll each ball into a round or triangle shaped piece. I always prefer to add more olive oil when I roll my chapathi


Beet Dry Curry
Beetroot(I used 4 medium)
Salt to taste
pepper powder - 4tablespoons
Diced Tomatoes - 1 cup
Diced Onions - 1 cup
Seasoning:
Channa Dal - 1 tsp
Urad Dal - 1 tsp
Curry leaves a few
Slit Green Chilli - 4
Oil - 1 tsp( I use Extra-Light olive oil)
Mustard- 1 tsp
Cumin - 1 tsp
Asafoetida - a pinch
Cloves 2
Cinnamon 1tsp
Fennel Seed 2tsp
Method
  •  Pressure cook  Whole Beets  till soft
  •  Peel the skin and chop, then Grate the Beet root
  •  Chopping beetroot is really tough before Cooking( I prefer to pressure cook it first)
  •  If you do not like to cook it with the skin on, you can quickly remove the skin and cook the whole beets.
  • Heat oil, add all seasoning ingredients , When the mustard pops, add the curry leaves and chopped beetroot.
  • Fry together and cook with a low-fire for 10 minutes
  • Finally add Diced tomatoes and Onions together and cook it for 3 minutes. I do not cook tomatoes and onion too much for this dry curry. I like the fresh onion smell in my curry.
Yummy!

Thursday, July 14, 2011

LinkWithin

Related Posts with Thumbnails