Search A n R

Tuesday, December 21, 2010

Weekend Wrap up: -)

This post is a tad bit late..but i dint want to miss joining Patty's last wrap up for this year. I thought of joining the party from AnR this time around. So here is what I did through the weekend.

Baked a batch of yummy samosa...whole wheat, stuffed with potatoes and peas masala
(sorry! no after pictures :P)

lazed around and cooked some more food...and moved some furniture around the house


and then decided to laze some more! Now, off I go to link up to Patty's weekend wrap up


Monday, December 20, 2010

Heart(h) n Home: Kitchen tours

I am all set for the new year, and hope to see things move and happen in 2011. I look forward to spicing things up on Avial and Rasam (AnR) with new features and post ideas. So how about a series showcasing beautiful kitchens.Yes, you heard it right, AnR will feature kitchen tours.

I believe, that home is where the heart(h) is...I would like to kick start the series with this very beautiful kitchen form Bengaluru...Here is a teaser .....beautiful isn't it :)...

Don't forget to join in for an exciting trip. BFN :)

PS: Inviting submissions...AnR would love to take a sneek-peek into your hearth n home too. 

Saturday, December 18, 2010

Raagi Lauki Kofta - Low fat and healthy!

A small twist to usual lauki kofta. I prefer using raagi (millet) flour instead of chickpea flour (besan). Baking the rolls instead of frying them is the low fat twist to an otherwise oil consuming recipe. to be honest, no sabzi is special in my kitchen, that is because, our menu looks like a buffet list everyday. (I am sure hubby would appreciate this dish more if i gave him a rasam, saambhaar or dal n curry routine everyday!)

This recipe packs wholesome goodness of bottle gourd and millet and is a crowd pleaser.

How about a picture tour !
Lauki and raagi mixed with spices (salt, turmeric powder, ginger, chillies and garam masala powder) - rolled and ready for baking.


Drizzle some oil (olive or any other cooking oil) and bake at 375 for 30 minutes (use the middle rack and roll them over after 15 minutes. The final five minutes, put the tray on the top rack for a crisp exterior)

let them cool
( raagi gives the kofta a deep choclate colour and a faint sweet flavour - so you may want to tone up the spice levels)


Work on the gravy - (onion, tomato, poppy seeds, dry coconut, almonds. peanuts, ginger, garlic, cloves, cardamom, coriander seeds, cumin and cinammon stick (tiny 1 cm piece)- ground together) and sauted in a tsp of oil and a bay leaf


drop in the kofta when gravy is well done. and pour in a tbsp of curd /cream (optional). Simmer for a minute and you are done.


serve with rice or parata. Works with a whole wheat bread slice as well!

PS:
you may fry the kofta, i bake them for a low fat version
raagi makes the kofta a little dense, adding 1/2 tsp of baking or cooking soda (for 1 1/2 cup of raagi) may help ( i dont add it though)
adding a spoon of sugar to the gravy seems to appeal to kids. (gives it a ketchuppy flavour i guess)


Tuesday, November 30, 2010

Pree's Giveaway

Pree, from Preeoccupied, has annouced a wonderful CSN giveaway...check her blog for more details...you will love her versatility and super yummy recipes...so take a look and enter the giveaway...(sorry open to US and Canadian residents only..)


A few rules to enter (quoting Pree)

  1. You will have to be a resident of US or Canada. Residents of other countries may enter for someone in the US/Canada. Please mention who you are entering for
  2. Visit CSN Stores and comment here about an item you like from there
  3. Let me know what you like or don’t like about this Blog
  4. Follow this Blog (via Google Friend Connect or NetworkedBlogs)
  5. Like my page on Facebook, Tweet or Blog about this giveaway
  6. Four entries per person will be allowed. Don't forget to LEAVE Your EMAIL and A SEPARATE COMMENT for each entry.
The deadline for entry is 11:59 PM on Sunday, December 12, 2010

All the best folks

Thursday, November 18, 2010

My Humble Salt and Pepper Shakers and a Blog carnival

Preethi of Indya Kaleidoscope told me about this super cool Salt and Peppa! blog party happening at Scatter the Batter. I decided to join in. What better way to get acquainted with fellow (food) bloggers..come on... lets face it...Avial and Rasam hardly has any friends...(lol)...so here is a snap shot of whatz at home. I have this really cute cheery yellow salt and pepper shaker my Parents-in-law bought me on their visit and a subsequent trip the US West coast.

They are not food grade so they just bring in a dash of yellow and a pop into a rather bland, white kitchen.
I couldnt take a picture with them in their actual places..as my kitchen doesnt receive enough sun light. :)...

I am particularly proud of my thrift store find - The vintage pepper grinder for a $1.50..it works ok and looks super cute on my countertop!!


While I am on a trip to connect with fellow bloggers, let me mention a super cool contest/giveaway Preethi has organized on her blog...more details here and here..all the best ..Ok...off I go to join the Salt and Peppa party at Scatter the batter...:)..until later..take care folks and eat healthy...remember you are what you eat!

Tuesday, November 16, 2010

Green apple and Gourd seeds chutney (thuvayal)

I grew up seeing my amma make use of every possible part of a vegetable.And I follow suit. I wrote about snake gourd seeds Thuvayal / chutney. >>Here. I generally come up with thuvayal on the spur, but never write down any recipe. I am used to going blank when someone asks me for a recipe...believe me I just cannot get down to writing down stuff (snob!...so excuse me that I am just putting up the picture of sauted ingredients. :P)..I forgot to click a picture after the grinding...lol...

Pic: shutterstock.com


All you need : to serve 2 (generously)
Green Apple (I used granny smith)..- 1 (big one!)
Snake gourd seeds - 1 cup
tamarind - (pulp)- 1 tsp or say the size of a marble (or lesser)
salt, turmeric, asafeotida
cumin - 1/4 tsp
mustard seeds- 1/4tsp
urad dal - 1/4 tsp
chana dal - 1/4 tsp
curry leaves - 4
corainder /cilantro - 1/4 cup
red chilli- 1
coriander seeds - 1 tsp
oil - 1/2tsp

process:
Temper mustard seeds, cumin, dals, red chilli, curry leaves and coriander seeds
Add snake gourd seeds and apple (cubed)
salt, turmeric powder, asafoetida/hing and saute until the seeds loose their raw smell
add cilantro/coriander leaves and leave it covered for a minute
take it off the stove and cool before grinding. Add the tamarind pulp or the soaked tamarind while you grind the thuvayal

Easy isnt it!

PS:
Tried a variant - gauva (jamakaya) as well and I loved that chutney too.
I use these chutneyz as my salad dressing...they lend a sweet and tangy flavour..yum!

Monday, November 1, 2010

Stuffed Bittergourd (Karela)

I love Karela (bitter gourd) and this time around, I wanted to write down the recipe I learnt from a Bengali neighbour while living in Pune. The basic stuffing is made of poppy and mustard seeds. This lends a distinct heat to the vegetable and even helps reduce the bitter taste I guess (who knows, I cant tell..lol). I make it often but I never thought of writing it down. A few ingredients lacking most of the time though. This post has been in a draft state for ever..i have been too tied up with things in life to have been blogging :)..better late than never is what works apt here!!..so here we go

All you need (Serves 2)
Karela - 3 or 4
Mustard seeds (black variety) - 1 tbsp
Poppy Seeds - 1 tbsp
Red chillies- 2 (adjust the chillies to suit your need - mustard seeds lend their heat)
Turmeric powder - a pinch
Salt to taste
A special tempering mix (very Bengali)- Panch Phoron - 1 tsp
(Fenugreek (মেথি methi), Nigella seed (কালো জিরা kalo jiraCumin seed (জিরা jira), Radhuni (রাধুনি radhuni), Fennel seed (সঁওফ sőf or মৌরি mouri) )source- wiki
til or an cooking Oil - 1 tsp


process (I'll let the pics do the talking!!)
Grind a mixture of poppy seeds, red chillies, turmeric powder 
slit open small karelas and salted them and left them for ten minutes ( adding salt sweats a vegetable so be ready to give the karelas a light wash and then gently drain the excess water out)
stuff the karela with the poppy seeds paste 


 cook them (in a plate) in a microwave for five minutes

put in the tempering ingredients in a  the pan/kadai put in pre cooked karela and cook until done (cook it in as little oil as possible...I sprinkle in some water to cook it better...its a misconception that more oil means more flavour!)


After the cooking and roasting is done. Take the karela out to serve with steamed rice or roti.

PS: i love to eat it as is!! cant help my love for the veggie!

I do not claim (bengali) authenticity of the dish ..it is something i learnt by seeing aunty (K's mom) make it..never got the chance it write it down...any suggestions pleasantly welcome!!

Tuesday, September 28, 2010

Germany 's Influence on World Cuisine - Beyond Beer and Sausages

Germany is known for its Oktober fest and the beer loving population. There is more to Germany and its cuisine. It may not be as popular as its snooty counterpart - French food!!...but the German Kitchens have contributed more than fair share to the world cuisine.

Interested in knowing more about German food??

If you thought German cuisine was nothing more than Beer and Sausages. Then you definitely need to see this episode of Planet food - Germany special!!

The n number of bread varieties and the desserts are to die for...If you have eaten Black forest cake and love it..It is good to know that it is from a region by the same name- Black Forest in Germany..Here is how its made...


youtube

PS: I am in the process of researching more on similarities and variants of vegetarian dishes from Germany (Oh yes! there are quite a few of them !!). I ll be back with a post soon :")

Thursday, September 23, 2010

Going Nuts?!! - Have a Banana

This may come as a surprise to many, I was too. A very dear friend of mine sent me an article on benefits of banana and I had to share it on Avial and Rasam


 Pic source: uberreview(dot)com

Going Bananas
Bananas... This is very interesting. 
After Reading THIS, you'll NEVER look at a banana in the same way again -
Bananas. Containing three natural sugars - sucrose, fructose and glucose combined with fiber, a banana gives an instant, sustained and substantial boost of energy. Research has proven that just two bananas provide enough energy for a strenuous 90-minute workout. No wonder the banana is the number one fruit with the world's leading athletes.
But energy isn't the only way a banana can help us keep fit. It can also help overcome or prevent a substantial number of illnesses and conditions, making it a must to add to our daily diet.
Depression:
According to a recent survey undertaken by MIND amongst people suffering from depression, many felt much better after eating a banana. This is because bananas contain tryptophan, a type of protein that the body converts into serotonin, known to make you relax, improve your mood and generally make you feel happier. 
PMS: Forget the pills - eat a banana. The vitamin B6 it contains regulates blood glucose levels, which can affect your mood.
Anemia: 
High in iron, bananas can stimulate the production of haemoglobin in the blood and so helps in cases of anemia.
Blood Pressure: 
This unique tropical fruit is extremely high in potassium yet low in salt, making it the perfect to beat blood pressure. So much so, the US Food and Drug Administration has just allowed the banana industry to make official claims for the fruit's ability to reduce the risk of blood pressure and stroke.
Brain Power: 
200 students at aTwickenham (Middlesex) school were helped through their exams this year by eating bananas at breakfast, break, and lunch in a bid to boost their brain power. Research has shown that the potassium-packed fruit can assist learning by making pupils more alert.
Constipation: 
High in fiber, including bananas in the diet can help restore normal bowel action, helping to overcome the problem without resorting to laxatives.
Hangovers: 
One of the quickest ways of curing a hangover is to make a banana milkshake, sweetened with honey. The banana calms the stomach and, with the help of the honey, builds up depleted blood sugar levels, while the milk soothes and re-hydrates your system.
Heartburn: 
Bananas have a natural antacid effect in the body, so if you suffer from heartburn, try eating a banana for soothing relief.
Morning Sickness: 
Snacking on bananas between meals helps to keep blood  sugar levels up and avoid morning sickness.
 Mosquito bites: 
Before reaching for the insect bite cream, try rubbing the affected area with the inside of a banana skin. Many people find it amazingly successful at reducing swelling and irritation.
 Nerves: 
Bananas are high in B vitamins that help calm the nervous system.
 Overweight and at work? 
Studies at the Institute of Psychology in Austria found pressure at work leads to gorging on comfort food like chocolate and crisps. Looking at 5,000 hospital patients, researchers found the most obese were more likely to be in high-pressure jobs. The report concluded that, to avoid panic-induced food cravings, we need to control our blood sugar levels by snacking on high carbohydrate foods every two hours to keep levels steady.
 Ulcers: 
The banana is used as the dietary food against intestinal disorders because of its soft texture and smoothness. It is the only raw fruit that can be eaten without distress in over-chronicler cases. It also neutralizes over-acidity and reduces irritation by coating the lining of the stomach.
 Temperature control: 
Many other cultures see bananas as a "cooling" fruit that can lower both the physical and emotional temperature of expectant mothers. In Thailand, for example, pregnant women eat bananas to ensure their baby is born with a cool temperature.
 Seasonal Affective Disorder 
(SAD): Bananas can help SAD sufferers because they contain the natural mood enhancer tryptophan.
 Smoking: 
Bananas can also help people trying to give up smoking. The B6, B12 they contain, as well as the potassium and magnesium found in them, help the body recover from the effects of nicotine withdrawal.
 Stress: 
Potassium is a vital mineral, which helps normalize the heartbeat, sends oxygen to the brain and regulates your body's water balance. When we are stressed, our metabolic rate rises, thereby reducing our potassium levels. These can be rebalanced with the help of a high-potassium banana snack.
 Strokes: 
According to research in "The New England Journal of Medicine, "eating bananas as part of a regular diet can cut the risk of death by strokes by as much as 40%!
Warts: 
Those keen on natural alternatives swear that if you want to kill off a wart, take a piece of banana skin and place it on the wart, with the yellow side out. Carefully hold the skin in place with a plaster or surgical tape!
So, a banana really is a natural remedy for many ills. When you compare it to an apple, it has four times the protein, twice the carbohydrate, three times the phosphorus, five times the vitamin A and iron, and twice the other vitamins and minerals. It is also rich in potassium and is one of the best value foods around.
So maybe its time to change that well-known phrase so that we say, "A banana a day keeps the doctor away!"
 
PS :
Bananas must be the reason why monkeys are so happy & Healthy all the time!


Source of the article unknown...any input appreciated!!

Friday, September 17, 2010

Blogosphere finds - Little Food junction

I came across this wonderful food blog...Little Food Junction and bookmarked for future use! ;-). I dont have kids as of now, but I am sure it would be useful someday :-). I loved the author Smita's approach to manage picky and fuzzy eaters (Kids in particular!!). (Arthi this post is specially for you and Shruti kutty.)


Check out her blog and the CSN giveaway (I think for US and Canada residents).

I am sure, after my amma's techniques to get people to ear food the fun way, this blog is going to be a major source of inspiration for me.

Sunday, August 29, 2010

Whole Wheat Pizza - all home made :-)

Yes guys, this has been made from scratch. I am trying to use up my stock of yeast. hence the bread making and pizza making spree for the last few weeks. This was not the first pizza I made, however, lazy me!...I couldnt get to post pictures on the blog!!

I love home made stuff cos I can add a truck load of veggies to the dish and make it as yummy as I can...lol..(what else do u expect from a foodie.). The dough is made from scratch at home. And keeping in tune with my promise to be as sustainable as I could, I bough locally grown vegetables and cheese for the topping. It turned out yum!!

How its made?
Pizza base
Whole wheat flour - 2 1/4 cup
active dry yeast - 1 tbsp
milk or water to activate the yeast - 3/4
honey - 1tsp
salt- a pinch
herbs (optional)- 1 tsp (includes - oregano, basil and curry leaves (it lends a south indian flavour to the dough..but it works for me!!)
olive oil (extra virgin) - 1 tbsp

Sauce- I follow a recipe I learnt from a chef friend..it is the yummiest!
Tomatoes (Chopped) - 3/4 cup
Onion (pref red- chopped) - 1/2 cup
garlic - 1 clove
dry red chillies - 2
dry herbs - basil, dill and oregano - 1 tsp (all together)
salt to taste
olive oil - 1 tsp
turmeric powder - a pinch (optional) but works well!
Brown sugar or honey - 1 tsp (flavour enhancer) (optional)
Cilantro leaves - chopped - 1 tbsp
Parmesan cheese (grated) - 2 tbsp
almonds (roasted) (optional) - 5

Toppings (just go crazy!!)
Capsicum / bell peppers - 1/4 cup
Red and yellow bell peppers / capsicum - 1/4 cup
Onion (pref red) (i had white ones)- (long slices) - 1/4 cup
tomato - (long slices) - 1/4 cup
olives - 10 (green pr black) (chopped)
Jalapeños - 1/2 (cut into rings :)

Cheese
Mozzarella - 1 cup or lesser (grated)
Fontina (optional) - 1/4 cup (grated)
Parmesan - 1 tbsp

Process
The base

  • In a cup of warm water/milk (should be luke warm not hot! ), put in yeast and honey and mix well.  Leave for around 5 minutes for the yeast to get active...you will know it is done when you see it all frothy
  • In a bowl, mix the wheat flour, salt, and olive oil and create a small well in between!!fun isnt it!...pour in the yeast mixture and fold in the flour mix slowly.
  • I do not have a machine/kneader so I use my hands to gently knead the flour for about 5 to 8 minutes
  • Once you are done kneading, cover the bowl with a moist cloth and put in a warm and dry place to let the yeast do its work.
  • An hour later, you will find the dough risen and double its initial volume
  • Punch it down lightly and let it sit for another 45 minutes
  •  And then lay it out on a lightly floured surface and gently punch it with your palm...into the shape of your choice while assembling the pizza...(it need not necessarily be round!!)
  • Moving on to the next step - the sauce 
The Sauce
Take a tsp of extra virgin olive oil in a pan, saute chopped garlic and add chopped onions
Snip red chillies and add it along with salt, and dry herbs.
Saute for a whole minute and add in chopped tomato(es)
When the tomatoes look half done, add sugar, turmeric(optional),almonds and cilantro/coriander leaves
saute for a minute and take it off the stove and let it cool, shower the mix with parmesan cheese
Grind and you have the yummiest pasta/pizza sauce ready


The Assembly

  • Take the pizza dough out and drizzle a little flour on the rolling surface (kitchen platform in my case)
  • use a rolling pin or your hand and roll out the pizza base (be gentle)
  • Shift the base on to the tray or the sheet you plan to bake it on (I use my cookie trays)
  • And now start arranging the veggie goodness - 
  • spread the pizza sauce evenly, making sure you leave an inch off the edge
  • lay out the veggies in the order you love, (you could alternate them based on colour...fun project with your kids? maybe!)
  • Finally, arrange the cheese and give a final drizzle of olive oil (a little pepper and oregano would be good as well)


Cook it!
Preheat the oven at 375F and put in the pizza tray and bake for 25- 20 minutes
(lower temperatures will leave the crust soggy and higher temp will burn the toppings so be sure of your oven before you expect a well done pizza- All ovens arent created the same, hence the tip)


Ok enough of talking...lets dig in....care for a slice?

And a few snippets before I leave....
  1. Using whole wheat flour makes the crust a bit denser than the maida/allpurpose /unbleached flour crust, so you could choose to put in equal portions of whole wheat and maida flour
  2. Try stretching the base as much as you can if you use whole wheat, but make sure you dont puncture the dough (to avoid a flat pizza :-)
  3. Always layer the vegetables over the cheese so that they grill well and the cheese melts over the crust and as the crust rises, vegetables embed themselves into the cheese layer...YUM!


Sunday, August 15, 2010

Celebrating Independence :-)

August 15th 1947 saw a new beginning for the World's largest democracy. Then Prime Minister  Pandit Jawarhar lal Nehru hoisted the Tri-coloured flag to mark Independent India's foray into self governance. Every Indian does remember that and the end of nearly 250 years of colonial rule. Despite a very bloody partition, India has come a long way. As a nation, we do have a very long way to go.

I found this video on google videos
"The newsreel announcing India's independence to US audiences on August 15, 1947 (the first part deals with Pakistan's Independence the previous day). Shows Nehru delivering his famous "Tryst with Destiny" speech to the Assembly in Delhi with Lord and Lady Mountbatten in attendance."


On the 64th Independence day celebrating 63 years of Independence means a lot. I hope the nation grows to be the best place to live and celebrate life. 

Thought id share this amazing song


I am also reminded of the King Khan's song:


Jai Hind!!

Friday, July 30, 2010

Eggless Dry Fruit cake - Dates and Apricots

I havent been blogging for a while now. This time around in India, I showed off my baking skills to family (nice to be acknowledged for what i know ..right!!)...lol. On the menu were carrot cake, ginger snap cookies and mango swirl bread. I am back to Atl and was not sure what to bake to start my regular kitchen schedules. (It is quite tough to get back into a cooking routine after a great vacation). sigh!

I had to use up the apricots and dates in my pantry and ended up baking this yummy Dates and apricot cake. Dates are known to be a great source of fiber, zero calorie snack. I recently came to know that California was the haven for luscious date varieties in the US. (courtesy: travel channel)...hmm..got to try some soon....This Middle-East-Asian wonder fruit is known for its richness and a very fruity flavor.

Did you know that a few dates and a cup of unflavoured milk give you an instant energy boost?..Being rich in iron and potassium,  they are used as a great "Fast breaking" food by people following Ramadan fast (Islamic holy month). Dates contain folate and traces of Vit A, B and are considered great to treat anemia, fatigue and constipation. No wonder they are used to break a whole day of Ramadan/ ramzaan fast by people across the world.

(left: dried apricots; right : dry dates)

just FYI, this is how fresh apricots look
Pic: source wiki

Apricots  are a great source of beta carotene and help in reducing infections and skin issues. They are also a great source of Iron and Potassium. However, the dried versions contain Sulphur di-oxide (preservative) which is known to trigger asthma attacks. (hmm..another reason why we could avoid preserved food..right!!).  It is better to soak preserved /dried apricots in water for fifteen minutes before consumption. Remember to drain the water it was soaked in).

The recipe:

you need: for a loaf

Whole wheat flour - 2 cups
Sugar - (I used white this time) - 1 or 3/4 cup (dates lend a bit of their sweetness to the cake )
Olive oil or butter - 1/2 cup or lesser
Baking soda- 1 tsp
baking powder- 1tsp
(Cardamom) Elaichi powder - 1 tsp
Nutmeg powder - a pinch
Cinnamon powder - a pinch
milk or water -  1 1/2 cup
dry fruits : apricots and dates - Chopped - 1/2 cup

Process:
  • mix all the dry ingredients in a bowl - flour, sugar, baking soda, baking powder, cinnamon powder, cardamom powder
  • Add the dry fruits and butter / olive oil and knead them in. 
  • keep adding water/milk and mix in well. 
  • grease a bread loaf pan or a 9 x9 pan and pour in the batter
  • bake at 350 F / 180C for 35 minutes or until done (do the fork test)
  • Take it out of the oven and let it cool for a few minutes before popping it out onto to a plate
  • you could drizzle it with a tbsp of milkmaid /condensed milk or dust on a tbsp of powdered sugar and serve!

The cake turned out pretty moist and yummy...!!! Cant wait to finish the loaf

Note: We could use raisins instead of apricots as both lend the same sour and tangy sweet taste to the cake

Wednesday, June 23, 2010

Dum aaloo

I made dum aaloo sometime back and instead of posting my version, I wanted my friend Pooja to submit her recipe for a guest post. She obliged and sent me a picture and the recipe.


Dum Aloo recipe

18-20 small-sized potatoes
Oil to deep fry
½ tspn red chili powder
2 cups of yogurt
1 tspn coriander powder
1 tspn of dry ginger powder
1 tblspn of fennel powder
5-6 cloves
Salt to taste
tspn of roasted cumin powder
tspn of garam masala powder


Recipe
  • Boil the potatoes ( pressure cook -1 whistle )
  • Peel and prick the  boiled potatoes all over with the help of a fork. Heat oil in a kadai and fry the potatoes on medium flame till golden brown.
  • Whisk the yogurt with red chill powder ,salt, coriander powder, garam masala powder , dry ginger powder and fennel powder.
  • Heat 2-3 tbspn oil in a pan.
  • Add clove , half a cup of water and bring to a boil
  • Stir in the yogurt mixture and bring it to a boil
  • Add fried potatoes and cook till the potatoes absorb all the gravy and oil floats on top
  • Garnished with freshly roasted cumin powder(optional).

Serve with roti, parata or a bowl of steamed rice/jeera rice

Thursday, May 27, 2010

Summer time special - Vegetables on a skewer, BBQ style!

Summer is in and I feel like I am running out of ideas to keep my dinners appealing and appetizing. This has been a long pending promise to my hubby, a veggie bbq for dinner! I couldnt get to do the post immediately. Better late than never..right :).

All you need : serves 4
Capsicum / bell peppers : 3 (large) (Red, yellow and green)
Onion - 1
Tomatoes- 2
Pear - 1 (could use a green apple- optional)
cheddar cheese - 10 cubes (I cubed a store bought cheddar block)
Cucumber - 3 (smaller English / Indian variety)
Bamboo or metal skewers

for the sauce:
Salt to taste
Turmeric powder - a pinch
Kuzhambu powder - 2 tsp
olive oil - 2 tsps
Garam masala (All indian spices powder ) - 1/2tsp
Lemon juice - 2tbsps
Water - 2 tbsps


Process: 
Mix all the ingredients for the sauce and blend well
Soak the skewers in water for a few minutes
Wash and cube the vegetables
Coat the vegetables, all separately and keep them aside in different plates
Make sure to dip in tomatoes as the last ones.
Arrange them on to a skewer and onto a baking tray
Pour put them in a sequence to make a colourful line up
Place a few cubes of cheese over the veggies for them to melt over them
Bake at 375 F for 40 minutes (make sure to use the pre heat time as well)
Serve with a side of (rest of the ) cheese cubes and a cup of whipped yogurt or curd (optional)

Saturday, May 8, 2010

Summer Salad - Vegetables in flavoured curd

Summers  need an extra bit of that cooling via food and drinks. Why not try out a refreshing yet simple salad for a sunday afternoon lunch. Salad recipes are the simplest and the only time you spend is chopping the vegetables.

All you need
sweet red and yellow peppers - 5
white onions - 1 small
tomatoes - 2 small
Lettuce leaves (Iceberg) - five huge leaves/layers
Olives - 1/4 cup

For the dressing
Curd /Yoghurt - 1 cup
Lemon juice - 1 tbsp
Puli inji - 1 tsp
Olive oil - 1 tsp
Dried herbs (rosemary, oregano, basil) - a pinch each
Salt
Pepper powder - 1/2 tsp
Cumin powder - 1/2 tsp
Cilantro / coriander leaves for garnish

Process:
Chop up the vegetables and wash them thorougly. Tear up the leaves into tiny bits and make sure not to chop lettuce with a knife.

Whip up the curd, add all the dressing ingredients and mix well.
Add all the vegetables and mix well
Put the bowl of salad in the refrigerator if you like a cold salad (optional)
Yummy!

Tuesday, May 4, 2010

Puliogare - Iyengar style

Pulihodarai /pulihora/ Puliogare is among my favorites. I am sure that every South Indian would love a traditional Style puliodarai anyday. I love all the four variations in the recipe - Telugu, Iyengar and the typical tamil styles. Though the recipe sounds and looks the same on the whole, we do have subtle variations.


The Iyengar style recipe is considered the most authentic. I wanted to do a post, but then met a very talented blogger - Veda. One look at her food blog, and I decided to request het to do a guest post. I loved her writing style and her approach to creating a very descriptive post. Veda's Iyengar's Kitchen has a great collection of authentic Iyengar style recipes and snippets for the kitchen. I was touched to see that she had dedicated her food blog to her Paati (Grandmother). This talented lady also blogs - Kai Kriye, where she shares her artistic creations including crafting, painting, and decor ideas. I was happy when she obliged and sent her recipe to be featured on Avial and Rasam.

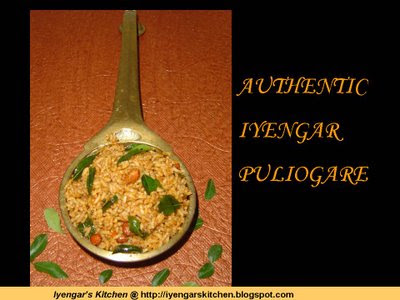
Presenting her very well written recipe with equally appetizing pictures!
Veda's Iyengar Puliogare 


The quantity of the paste what you get from the below mentioned ingredients can be stored for a year in a good, tight container. It roughly fills up a 700 ml container.
Dark Tamarind – 1½ cups (darker the tamarind, better it is, because it gives that extra dark brown color to the ogare)
Oil - ½ cup
Mustard seeds – 1 tspn
Curry leaves – 3 strands
Asafoetida (Hing) - ½ tspn
Red chillies (Preferably byadigi variety) – 8
Rasam powder – 8 tbl spns
Salt – According to taste
Jaggery – 2 blocks

Ingredients required for mixing the rice with the Gojju to make puliogare:

The quantity of ingredients given here are for the amount of rice mentioned. It may vary according to your taste and quantity of rice.
Cooked Rice – 2 cups (separate the grains by spreading it on a large plate)
Oil - ½ cup
Mustard seeds – 1 tspn
Curry leaves – 4-5 strands
Asafoetida (Hing) – ½ tspn
Ground nuts– Quarter cup
Grated Dry coconut – 2 tbl spns
Pulioyogare gojju or concentrate prepared earlier – 3 tbl spns
Salt to taste

Powders for seasoning:Black Sesame seeds (Ellu in kannada and Til in hindi) – 1½ tbl spns (don’t add too much, although it enhances the flavors….it might get bitter if added in a large quantity)
Peppercorns – 1 tspn
Coriander seeds – 1 tbl spn
Rasam powder – 2 – 3 tbl spns

Preparation: Steps 1- 13 are how to make the gojju or the paste and Steps 14 – 18 how to mix the concentrate with rice.

Step 1, 2 and 3: Soak the tamarind previous night in little water (about 2½ cups of water). Next day extract the juice of the tamarind by grinding it in a blender. Blend it to a smooth paste and sieve it as shown in Step 3. Extract as much as possible. Step 2 is just to show how much jaggery is required for 1½ cups of tamarind. 
 

Step 4: In a large deep bottomed pan, take Oil, add mustard (allow spluttering), curry leaves, asafoetida, red chillies. Fry and add the tamarind paste extract. Allow it to boil.

Step 5: Add rasam powder once it boils. Reduce the flame. Keep it at Low. This is a very important step because the more it boils in a lower flame chances are it doesn’t get burnt. This step is also important because the whole idea of a concentrated paste is to allow it to concentrate slowly.
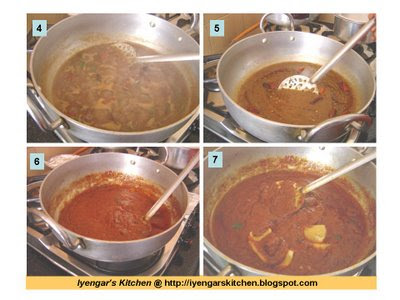
Step 6: Picture taken after 15 mins of boiling. Note how slowly the paste is getting concentrated. That’s the way typically puliogare gojju is prepared.

Step 7: Add salt and jaggery and continue to stir.

Step 8: We observed that we required more jaggery. How did we do that? Well tasted it of course!!!!

Again let me highlight this. It’s very important to taste it in between to check for the variations in the taste (less or more). Try imagining this! We want a combination of tanginess, spicyness and sweetness all in the above order. So try tasting and check what you need to add whether it is chilli powder or salt or jaggery. Try adding small portions. This way, you can be rest assured that you are not adding too much to mess up the taste. 
 Step 9, 10 and 11: Remember each picture taken here is after every 10 mins approximately. So the whole boiling process is about 1hr and 15 mins. That’s how long it should be boiled on a low flame to get the paste of desired consistency.

Steps 12 and 13: This picture is taken to show my readers just how the consistency should be. When you lift the ladle, the paste has to slowly fall back in to the pan. Again pictures are taken after every 10 mins. I wanted to time the whole process because it’s important for us to know just how long the boiling process is done.

After Step 13, you get a paste which is ready to be mixed with rice. At this point you can just store the whole paste if you are not going to mix with rice right away. The gojju or the paste can be kept in refrigerator up to one year. This is also one of the main reasons you have to boil for a long time because the shelf life is also longer.

If you plan to use the paste say after 1 month or more, the day you intend to use it keep the stored box out of the fridge and allow it come back to room temperature. (This will aid you in mixing with the rice more easily).

But if you plan to use the paste immediately proceed in the following way:

Step 14: Cook rice and separate the grains on a large plate. First wash the black sesame seeds, dry them well on paper towel. Fry them without oil in a small pan and when it splutters lightly, switch off the flame. Fry the coriander seeds and black peppercorns as well and grind them all together. Add this powder to the rice.

Step 15: Add grated dry coconut and rasam powder.

Step 16: Add the gojju (concentrated puliyogare paste prepared earlier)  


Step 17: Mix the rice with all the above powders and gojju first. IT’S VERY IMPORTANT TO MIX IT WITH HANDS. This is because all the flavors and the paste used get coated nicely on the rice. Then add the seasonings mentioned below.

Step 18: Take Oil in a small pan, add mustard seeds, asafoetida, curry leaves, ground nuts and allow them to splutter. Add this tempering to Rice. Taste it and add anything that’s less like salt, jaggery, etc...

Important Points:

Tamarind – Darker the better. Infact when we prepared, we weren’t able to get darker tamarind so that’s why the color is lesser. The original color of puliyogare has to be dark brown.

Red Chillies – The kind of red chillies we use is less spicy and gives more color. So that’s the reason we add the chillies and the rasam powder in large quantities. However not always can one find the same kind of chilli. So check for the spiciness of chillies that you use at home and then reduce or increase their number.

Rasam powder – It’s the base of a good puliyogare. Again we make this at home, so that it’s as authentic as possible. Many people prepare different kinds of rasam powders, so definitely the taste varies while mixing it in puliyogare. However you can always make a small batch of fresh rasam powder provided in the rasam powder link.

Black Sesame seeds – Always try to get a freshly manufactured packet. Because if it’s old and slightly smelly it could ruin your puliyogare. One very important point of black sesame seeds is that taste it before you use it in your puliogare. Because sometimes they can be bitter. If it’s bitter then don’t use it.

I know there are many people who are working and have kids to manage. Life can get busy when many such commitments are to be fulfilled. For such people, I would suggest to them to get the authentic iyengar puliyogare gojju mix from the condiment stores and try this with the rest of my preparation steps. I am not promising them that it will taste as authentic as the one mentioned above. However, you are still making an effort to make home puliyogare with the available ingredients.

My sincere suggestion to all my readers “Please experiment at least once with the above authentic recipe along with the gojju and you will never look back”!!!

It might take a while for one to master this, but then one has to start somewhere to get some practice right???? So there you go, I have revealed the most sought after recipe of Iyengars. Not that you haven’t seen many recipes of puliyogare on the net. But just that this one is from the IYENGAR’S KITCHEN.

Veda has inspired me to work on my style and methods to post a recipe. I have decided to create a blogroll to include vegetarian bloggers across the world, and Veda's blog is the first to be added to my food bloggers' list. Hope you enjoyed the post as much as I did compiling it. I am planning to make puliogare / tamarind rice this weekend.


Content and Pictures courtesy: Veda Murthy - Iyengar's Kitchen. I am sure you will love her blog and work as much as I do.

Tuesday, April 20, 2010

Home made Two Cheese Bread - Yummy!!!

I ate this two cheese bread while in Cyprus and fell in love with it. Two things, one because it is savory and second because it was so rustic and yummy, made from whole wheat. Is there anything not to love?...The recipe is fairly simple and needs a little time and patience (like any other bread!)..

All you need...

Whole Wheat flour - 3 1/2 cups
Active Dry yeast - 1 1/4 tbsp
Salt - 1/4 tsp
Feta cheese - 1 cup
Cheddar cheese - 1 cup
Olive oil - 1 tbsp
Honey - 1 tbsp
Oregano or basil (dry) - 1 tsp
Milk- 1/2 cup
Water (luke warm) - 2 cups (as needed )

Process:
  • Microwave a cup of water + milk for a minute (until lukewarm)
  • Make sure its luke warm and add honey and mix well
  • Add dry yeast and set aside for ten minutes - to activate the yeast (froth appears) (takes ten minutes or less)
  • In the meanwhile, add salt, cheeses, oil and oregano to the flour and mix well
  • Add the active yeast to the flour and knead the dough. Use the luke warm water if requried.
  • Leave the dough to rise and cover the container with a moist cloth (for thirty minutes or so)
  • After the first rise, take the dough onto a flat surface and punch it with your index finger
  • Put the moist cloth back and leave it in a warm, dry place for the second rise (take around 40 minutes)
  • Line the container ( you wish to bake your bread in ) with a little flour
  • Transfer the dough to the container and leave it covered with the cloth for another 10 minutes
  • Brush a mixture of milk and water onto the set dough for a beautiful crust
  • Preheat your oven at 375 F and bake the bread for 20-25 minutes. (keep checking cos each oven is different)
  • Pat lightly to check if its done.( A hollow sound means the bread is all set and done)
  • Let it cool for a few minutes before you slice
Ah! life cant get any better!!

Look at the lovely crust, and do u see the yummy cheese in every slice...Bake it and let me know how it turned out..:)

Serving Suggestion
You have a wonderful Savory bread to devor with a bowl of hot soup and roasted potatoes or plantain


Trivia:
  • Cheddar alone could be used for this bread
  • You could rub in a piece of garlic and sprinkle some mozzarella and drizzle some olive oil on top and leave it in the microwave for a minute or two for a yummy batch of home made garlic bread

Thursday, April 15, 2010

Carrot Coconut Poli - Vishu Special

Wishing every one a very happy Tamil New year and Vishu. Pa`lakkad Iyers and Malayalis arrange a vishu decoration to begin the new year. We look into the mirror as soon as we get up and pray for a healthy, peaceful and a prosperous year ahead. A mirror arrangement, done the previous night, is made to reflect fresh green and yellow vegetables, fruits, flowers on a bed of rice and dal. Money, clothes (preferably white) and a tiny krishna idol also form a part of the arrangement. Head of the family lights the lamp (placed in front of the mirror) early in the morning and prays for well being of kith and kin. Children are woken up and brought to the mirror with their eyes closed. They are made to view the arrangement in the mirror and given Kani (money). More on Vishu here >> Link


Among the various goodies made for this festival, Tamil kitchens have Poli on their menu. While in conversation with my ma in law, I was talking about different fillings for a poli and told her about my love for carrot and coconut poli (among other variations). She said she would try this one out and tell me. The perfectionist that she is, not only did she make the Carrot Coconut poli, but promptly sent me pictures. For all her enthusiasm, how could I not document it on Avial and Rasam. As a rule I tend to make poli out of every possible vegetable and fruit (lol)... My ma in law used Maida (all purpose flour...I stick to whole wheat flour or atta)

All you need: for Ten 6 " polis
  1. Carrot (grated) - 1 cup
  2. Coconut (shredded)- 1 cup
  3. Jaggery - 1 cup (or to suit your taste)
  4. Elaichi - 3 (powdered)
  5. Flour (maida/all purpose) - 2 1/2 cup
  6. Haldi /turmeric - 1 pinch
  7. Ghee / oil - 1/4 cup
  8. salt- 1/4 tsp (or less)
  9. Water - 2 cups (or as required)


Process:
Puran: (the stuffing / filling)
  • Add salt and turmeric to the maida (or whoel wheat flour) and pour in a tbsp of oil, add sufficient water and knead it into a dough (not too firm). Keep it aside and let the dough rest for an hour or so.
  • soak jaggery in 1/2 cup of water and when it dissolves completely, sieve it through a filter (to remove sediments if any)
  • In a Kadai, pour in the filtered jaggery water and simmer for a minute
  • Add the cardamom powder, combine carrots and coconut and cook until the ingredients are cooked and the mixture is dry and done
  • When the stuffing is cool, divide them into ten parts  
For the poli
  • Divide your 10 dough into equal parts and roll each one out into a mini roti and place the filling on top
  • close the rolled out and stuffed  roti and use a little oil and press it down (with your fingers and the palm)
  • Roast it in a flat pan /tava apply oil or ghee(clarified butter) once both sides are done

Serving suggestion
serve with a cup of milk


Trivia
  • This makes a wonderful dessert and is made in most south Indian homes. 
  • A traditional Poli is stuffed with a mixture of split Chickpea and jaggery. There could be regional variations though.
  • What its called- Marathi - Puran Poli; Telugu- bobbattu; Tamil - Poli; Kannada - Obbatu
  • (Whatever the name, this dish tastes just as sweet!)
  • any vegetable which go into a parata works well in a poli...a little imagination and the possibilities are endless
Do try and let me know !!!!

    Thursday, March 25, 2010

    Home made Granola

    Breakfast is the most important meal of your day. Don't we all know the oft repeated health mantra -Eat breakfast like a king, lunch like a prince and dinner like a pauper. This time around, I wanted to post a simple Granola recipe which works well with busy schedules and people with a sweet tooth (people like srinath..lol..). I make this granola for him.(I cannot eat anything sweet as the first thing in the morning). I am not into buying any name brand breakfast cereals for N number of reasons. Making granola or any other cereal at home is easier than you think and also saves you from the guilt of eating ingredients you cant spell (read preservatives and food additives)...:). Technically speaking, any breakfast cereal is nothing but the sweeter version of our regular chivda or poha/aval mixture.

    All you need: serves 10
    Rolled (Cooking) oats - 3 cups
    Almonds (chopped or whole) - 1 cup
    Dry Coconut  - 1/2 cup grated (optional)
    Brown sugar (light) - 1/2 cup (or less)
    Honey - 1/4 cup
    Olive oil - 1/4 cup (or less)
    Salt - 1/4 tsp
    Raisins - 1/2 cup (optional)

    Method
    • Start the oven at 285 degrees F 
    • Use pre heat time as well. Spread oats and almonds on a baking sheet and roast in the oven for 5 - 8 minutes (keep checking and sifting through the oats to avoid burning)
    • Take the tray out and let it cool for a few minutes
    • Take a mixing bowl and combine the oats, almonds, raisins, coconut, and brown sugar mix them well
    • In a separate bowl, combine honey, oil, and salt.
    • Pour the dry ingredients into the wet mixture and mix well using a spatula or a spoon
    • Spread the mixture on baking trays and leave it in the oven for 40- 45 minutes
    • Make sure that you stir every 15 minutes to prevent oats from burning.
    • Remove from oven and transfer into a large bowl. Add raisins and mix until evenly distributed. 
    Let the granola cool for at least an hour before you transfer it to an air tight container. Enjoy this yummy granola with warm milk and diced fruits and have a wonderful day.

    Wednesday, March 24, 2010

    Rama Navami Vaazhthukkal (subakaankshalu)

    Celebrating Rama Navami means wishing Lord Sri Rama a happy bday :). This day is also celebrated as Sita- Rama wedding day.

     source:akbarpasha.files.wordpress
     Sri Rama temple in Bhadrachalam is known for its extravagant celebrations.Here is the video of Sita Rama Kalyana Mahotsavam at Bhadrachalam. The voice over is in Telugu (low volume recommended)
    source : youtube
    This festival is celebrated with a lot of fanfare in every Rama temple in Andhra Pradesh, India. 

    Celebrations at home:
     We offer prayers to Sri Rama and serve the following as naivedyam.
    • Panakam (jaggery, dry ginger powder and elaichi/cardamom powder and a hint of lemon juice, all diluted in water)
    • Neer mooru (diluted buttermilk garnished with fresh grated ginger, green chillies, salt, asafoetida, curry leaves and cilantro/Coriander leaves)
    • Vada Paruppu (pappu) - A refreshing salad made from pre soaked moong dal, green mango, salt, asafoetida and lemon juice. Curry leaves and cilantro/coriander leaves for garnish. I also added some grated carrot.

    Interesting facts- 
    I came to know these interesting facts about Rama Navami from Rukku Perima (aunt). She said

    "Rama Navami marks the onset of Indian Summer and people gear up to tackle rising temperatures. Naivedyam served includes, panakam, neer mooru and vada paruppu. All these dishes are a great way to refresh our digestive system and prepare our body to bear the summer heat. On Ram Navami, we generally serve Panakam and Mooru when guests arrive home. This is Indian hospitality at its best and a great way to help them ward off heat and prepare their appetite for a sumptuous meal.

    Also, this is the time when people used to begin their pilgrimages in the olden days. And communities and groups used to set up Chalivindhrum to serve free buttermilk to travelers passing through their village.This tradition continues till date and it feels nice to be served with fresh buttermilk when cool a parched throat "

    I love the fact that Indian traditions have something special to mark every occasion, be it welcoming seasons, or celebrating life in general.

    Please share any other information you have about our festivals with me. Would love to know more!

    LinkWithin

    Related Posts with Thumbnails